VirtualBox on Debian Buster
Virtualbox enables a Linux user to host multiple guest operating systems as virtual machines. Useful for experimenting with different Linux distros and configurations!
Let's go!
In this HOWTO I install Virtualbox on a Debian HOST and create a Debian GUEST virtual machine.
Virtualization support
Confirm that virtualization support is enabled in your system's BIOS. If so, the following commands will return some output:
- for Intel processors ...
$ grep --color vmx /proc/cpuinfo
- for AMD processors ...
$ grep --color svm /proc/cpuinfo
If no output, the processor might still be virtualization-capable but with the option disabled. Check in the BIOS and enable if available.
Install Virtualbox on HOST
Kernel modules for Virtualbox are built via Dynamic Kernel Module Support (DKMS). After installing Virtualbox below, the vbox modules should be auto-built and -loaded.
Install ...
$ sudo apt install dkms module-assistant linux-headers-$(uname -r)
Packages for Virtualbox have been removed from Debian 10, so I retrieve the latest *.deb package from Oracle itself by configuring a Debian third-party repository.
Install the Oracle signed GPG public keys ...
$ wget -q https://www.virtualbox.org/download/oracle_vbox_2016.asc -O- | sudo apt-key add -
Run command apt-key list and confirm the VirtualBox archive signing key fingerprint matches ...
B9F8 D658 297A F3EF C18D  5CDF A2F6 83C5 2980 AECF
Oracle Corporation (VirtualBox archive signing key) <info@virtualbox.org>
Add virtualbox.list to /etc/apt/sources.list.d ...
$ sudo sh -c "echo 'deb https://download.virtualbox.org/virtualbox/debian buster contrib' >> /etc/apt/sources.list.d/virtualbox.list"
Refresh package listings, install Virtualbox, and assign your username (example: foo) to the vboxusers group ...
$ sudo apt update && sudo apt install virtualbox-6.1
$ sudo adduser foo vboxusers
Reload the shell and confirm the new group has been added to the user's assigned groups ...
$ su - $USER
$ id
Launch Virtualbox and create GUEST
Run ...
$ VirtualBox
With the current release, I immediately ran into the issue of VB using an unreadable colour scheme of light grey foreground text on a white background. Unlike other QT apps, Virtualbox does not respect GTK dark themes (which I am using).
Workaround: Start VB with a more usable colour scheme (black text foreground/white background) ...
$ VirtualBox -style Fusion %U
Default Machine Folder where Virtual Machine (VM) images are stored is ~/Virtualbox VMs. This can be modified in File->Preferences->General.
See the User Manual for creating a GUEST VM. I use the netinst installer to create a new minimal Debian virtual machine.
Console display
Debian GUEST in console mode defaults to a small 80x40 window. Resize by rebooting the GUEST and configure GRUB:
- Grub boot screen: hit
cto enter command mode - At the prompt
grub>: runvbeinfoto display supported resolutions (example:1024x768) - Modify
/etc/default/grub: add ...GRUB_CMDLINE_LINUX_DEFAULT="nomodeset"GRUB_GFXMODE=1024x768GRUB_GFXPAYLOAD_LINUX=keep(Helpful!)
- Save changes, run
update-gruband reboot
Guest additions
Guest Additions is an iso image file included in the VirtualBox package, and is installed inside the virtual machine GUEST after the operating system is installed. It enables extra features such as the ability to tweak display settings and add a shared folder between HOST and GUEST.
Launch the new Debian GUEST. Refresh package listings and install build tools ...
# apt update && apt install dkms module-assistant linux-headers-$(uname -r) && m-a prepare
In the Debian GUEST window, load Devices->Insert Guest Additions CD Image .... If the image is not auto-mounted, mount it manually ...
# mount /media/cdrom0
Install VBoxLinuxAdditions.run on GUEST ...
# sh /media/cdrom0/VBoxLinuxAdditions.run
Assign username (example: foo) to group vboxsf ...
# adduser foo vboxsf
Reboot GUEST.
Graphical desktop display
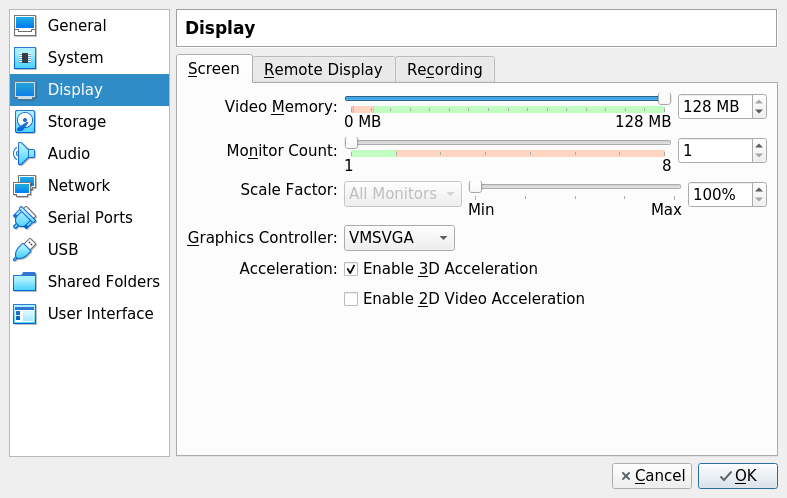
Tweak display settings by going to Machine->Settings->Display to add more video memory and enable 3D acceleration.
Display and resolution can be changed when running a graphical environment. If the GUEST VM does not use a graphical login manager to launch its desktop, then modify ~/.xinitrc to start VBoxClient services ...
VBoxClient --clipboard &
VBoxClient --display &
VBoxClient --seamless &
Shared folder
Create a shared folder on HOST. Make it accessible to GUEST virtual machines by going to Machine->Settings->Shared Folders. Click on Adds new shared folder, set the Folder Path, and select Auto-Mount.

SSH from HOST to GUEST
Host-only networking with Virtualbox was a big help getting this properly configured.
I want to SSH from my HOST to GUEST. Default configuration supplies GUEST with a NAT interface for internet access but no HOST<->GUEST connectivity. A solution for local access is creating a host-only adapter.
On the HOST
In the Tools sidebar, click the Menu icon and select Network. Click Create and a new host-only network card - vboxnet0 - is configured with default address 192.168.56.1 and DHCP Server enabled.
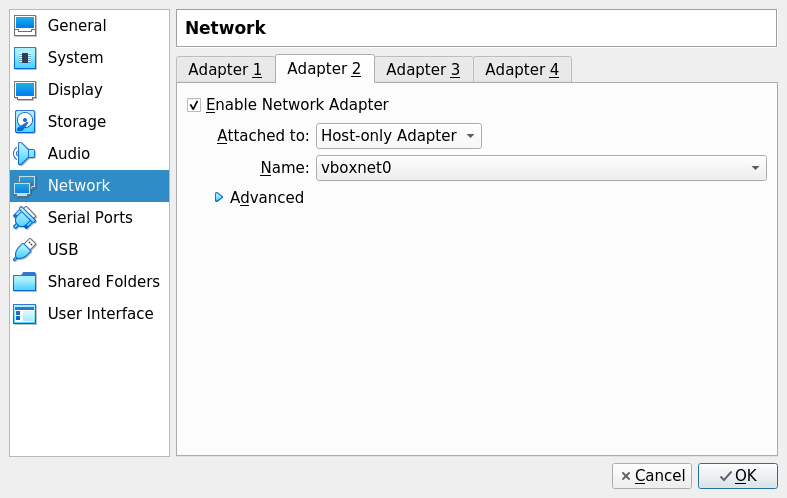
Select the GUEST virtual machine and in Machine->Settings->Network click on Adapter 2, click on Enable Network Adapter and Attached to Host-only Adapter, and select vboxnet0.
On the GUEST
Start GUEST. Install the SSH server ...
# apt install openssh-server
Confirm the new interface has been created ...
$ ip a
Add the interface to /etc/network/interfaces (example: enp0s8) ...
# Host-only interface
auto enp0s8
iface enp0s8 inet dhcp
Bring up the interface ...
# ifup enp0s8
Interface is assigned an address (example: 192.168.56.101) and can now be accessed via SSH.
Optional: Assign GUEST a static address outside the range of the DHCP server (ports 101-254) ...
# Host-only interface
auto enp0s8
    iface enp0s8 inet static
    address 192.168.56.50
    netmask 255.255.255.0
    network 192.168.56.0
    broadcast 192.168.56.255
» Next: Secure remote access using SSH keys
« Previous: Heavenly breezes